> ## Documentation Index
> Fetch the complete documentation index at: https://felimet-hub.jmcores.com/llms.txt
> Use this file to discover all available pages before exploring further.

# Windows CUDA & cuDNN Development Environment Setup Guide

> Step-by-step Windows guide for installing NVIDIA drivers, the CUDA Toolkit, and cuDNN: a deep learning environment setup walkthrough with verification steps.

export const TerminalDemo = ({lang = "zh", title, prompt, commands}) => {
  const L = ({
    zh: {
      play: "播放",
      pause: "暫停",
      step: "下一步",
      replay: "重新播放",
      reset: "重設",
      winTitle: "Windows PowerShell",
      hint: "點播放，逐行看驗證流程實際跑出來的樣子"
    },
    en: {
      play: "Play",
      pause: "Pause",
      step: "Step",
      replay: "Replay",
      reset: "Reset",
      winTitle: "Windows PowerShell",
      hint: "Press play to watch the verification run line by line"
    }
  })[lang] || ({});
  const defaultCmds = [{
    cmd: "nvidia-smi",
    output: ["Mon Jun  8 14:30:12 2026", "+-----------------------------------------------------------------------------+", "| NVIDIA-SMI 552.22       Driver Version: 552.22       CUDA Version: 12.4     |", "|-------------------------------+----------------------+----------------------+", "| GPU  Name           TCC/WDDM  | Bus-Id        Disp.A | Volatile Uncorr. ECC |", "| Fan  Temp Perf Pwr:Usage/Cap  | Memory-Usage         | GPU-Util  Compute M. |", "|===============================+======================+======================|", "|   0  GeForce RTX 3080  WDDM   | 00000000:01:00.0  On |                  N/A |", "| 30%   42C  P8    21W / 320W   |    842MiB / 10240MiB |      2%      Default |", "+-------------------------------+----------------------+----------------------+"]
  }, {
    cmd: "nvcc -V",
    output: ["nvcc: NVIDIA (R) Cuda compiler driver", "Copyright (c) 2005-2024 NVIDIA Corporation", "Built on Tue_Feb_27_16:28:36_2024", "Cuda compilation tools, release 12.4, V12.4.99", "Build cuda_12.4.r12.4/compiler.34097967_0"]
  }, {
    cmd: "python gpu_test.py",
    output: ["========================================", "PyTorch Version: 2.6.0+cu124", "CUDA Available:  True", "Device Name:     NVIDIA GeForce RTX 3080", "CUDA Version:    12.4", "✓ cuDNN Test Passed! Convolution executed successfully.", "========================================"]
  }];
  const raw = commands && commands.length ? commands : defaultCmds;
  const cmds = raw.map(c => ({
    cmd: c.cmd,
    lines: Array.isArray(c.output) ? c.output : String(c.output || "").split("\n")
  }));
  const PROMPT = prompt || "PS C:\\Users\\dev>";
  const TITLE = title || L.winTitle;
  const [idx, setIdx] = useState(0);
  const [typed, setTyped] = useState(0);
  const [outN, setOutN] = useState(0);
  const [stage, setStage] = useState("cmd");
  const [running, setRunning] = useState(false);
  const [done, setDone] = useState(false);
  useEffect(() => {
    if (!running || done) return;
    const cur = cmds[idx];
    if (!cur) {
      setRunning(false);
      setDone(true);
      return;
    }
    if (stage === "cmd") {
      if (typed < cur.cmd.length) {
        const id = setTimeout(() => setTyped(typed + 1), 28);
        return () => clearTimeout(id);
      }
      const id = setTimeout(() => setStage("out"), 200);
      return () => clearTimeout(id);
    }
    if (stage === "out") {
      if (outN < cur.lines.length) {
        const id = setTimeout(() => setOutN(outN + 1), 70);
        return () => clearTimeout(id);
      }
      const id = setTimeout(() => {
        if (idx + 1 < cmds.length) {
          setIdx(idx + 1);
          setTyped(0);
          setOutN(0);
          setStage("cmd");
        } else {
          setRunning(false);
          setDone(true);
        }
      }, 360);
      return () => clearTimeout(id);
    }
  }, [running, done, idx, typed, outN, stage]);
  const reset = () => {
    setRunning(false);
    setDone(false);
    setIdx(0);
    setTyped(0);
    setOutN(0);
    setStage("cmd");
  };
  const playPause = () => {
    if (done) {
      reset();
      setRunning(true);
      return;
    }
    setRunning(!running);
  };
  const step = () => {
    setRunning(false);
    if (done) return;
    if (idx + 1 < cmds.length) {
      setIdx(idx + 1);
      setTyped(0);
      setOutN(0);
      setStage("cmd");
    } else {
      const cur = cmds[idx];
      setTyped(cur.cmd.length);
      setOutN(cur.lines.length);
      setStage("out");
      setDone(true);
    }
  };
  const css = `
.td-root{--bg:#f4eee4;--bd:#e2d7c6;--ink:#5b5048;--accent:#bf7551;--accent-l:#cf8a68;
  --scr:#1c1815;--scr-fg:#e9e1d4;--scr-prompt:#cf8a68;--scr-dim:#8d8478;--scr-ok:#8fb573;--scr-err:#d98a72;
  border:1px solid var(--bd);border-radius:14px;overflow:hidden;background:var(--bg);
  font-family:ui-sans-serif,system-ui,"Noto Sans TC",sans-serif;margin:1.25rem 0;box-shadow:0 1px 2px rgba(60,40,25,.06);}
.dark .td-root{--bg:#26221e;--bd:#3a332c;--ink:#cabfb2;}
.td-bar{display:flex;align-items:center;gap:.6rem;padding:.55rem .8rem;background:linear-gradient(var(--bg),color-mix(in srgb,var(--bg) 90%,#000));border-bottom:1px solid var(--bd);}
.td-dots{display:flex;gap:.4rem;}
.td-dots i{width:11px;height:11px;border-radius:50%;display:block;}
.td-dots i:nth-child(1){background:#d98a72;} .td-dots i:nth-child(2){background:#dcb46a;} .td-dots i:nth-child(3){background:#8fb573;}
.td-title{font-size:.78rem;color:var(--ink);font-weight:600;letter-spacing:.01em;flex:1;text-align:center;opacity:.85;}
.td-ctrl{display:flex;align-items:center;gap:.3rem;}
.td-btn{display:inline-flex;align-items:center;gap:.32rem;border:1px solid var(--bd);background:transparent;color:var(--ink);
  border-radius:8px;padding:.3rem .55rem;font-size:.74rem;font-weight:600;cursor:pointer;transition:all .15s ease;line-height:1;}
.td-btn:hover{border-color:var(--accent);color:var(--accent);background:color-mix(in srgb,var(--accent) 10%,transparent);}
.td-btn svg{width:13px;height:13px;}
.td-btn--primary{background:var(--accent);border-color:var(--accent);color:#fff;}
.dark .td-btn--primary{background:var(--accent-l);border-color:var(--accent-l);}
.td-btn--primary:hover{background:var(--accent-l);color:#fff;}
.td-count{font-size:.72rem;color:var(--ink);opacity:.6;font-variant-numeric:tabular-nums;margin-left:.2rem;}
.td-screen{background:var(--scr);color:var(--scr-fg);padding:.85rem 1rem 1.05rem;font-family:ui-monospace,"Cascadia Code","Consolas",monospace;
  font-size:.8rem;line-height:1.55;overflow-x:auto;min-height:120px;}
.td-block{margin-bottom:.5rem;}
.td-cmdline{white-space:pre;}
.td-prompt{color:var(--scr-prompt);font-weight:600;}
.td-cmd{color:#f3ecdf;}
.td-out{white-space:pre;color:var(--scr-fg);opacity:.92;}
.td-out.ok{color:var(--scr-ok);font-weight:600;}
.td-out.err{color:var(--scr-err);font-weight:600;}
.td-cursor{display:inline-block;width:8px;height:1em;background:var(--scr-prompt);margin-left:1px;vertical-align:text-bottom;
  animation:tdblink 1s steps(2,start) infinite;}
@keyframes tdblink{to{opacity:0;}}
.td-hint{padding:.5rem .9rem;font-size:.72rem;color:var(--ink);opacity:.6;border-top:1px solid var(--bd);background:var(--bg);}
@media (max-width:600px){.td-screen{font-size:.68rem;} .td-title{display:none;} .td-btn{padding:.28rem .42rem;}}
`;
  const PlayIcon = () => <svg viewBox="0 0 24 24" fill="currentColor" stroke="none"><path d="M7 5.5v13l11-6.5z" /></svg>;
  const PauseIcon = () => <svg viewBox="0 0 24 24" fill="currentColor" stroke="none"><rect x="6.5" y="5" width="4" height="14" rx="1" /><rect x="13.5" y="5" width="4" height="14" rx="1" /></svg>;
  const StepIcon = () => <svg viewBox="0 0 24 24" fill="none" stroke="currentColor" strokeWidth="2.2" strokeLinecap="round" strokeLinejoin="round"><path d="M5 4l10 8-10 8z" /><line x1="19" y1="5" x2="19" y2="19" /></svg>;
  const ResetIcon = () => <svg viewBox="0 0 24 24" fill="none" stroke="currentColor" strokeWidth="2.2" strokeLinecap="round" strokeLinejoin="round"><path d="M3 12a9 9 0 1 0 3-6.7L3 8" /><path d="M3 3v5h5" /></svg>;
  const shown = Math.min(idx + (done ? 1 : 0), cmds.length);
  return <div className="td-root">
      <style>{css}</style>
      <div className="td-bar">
        <span className="td-dots"><i /><i /><i /></span>
        <span className="td-title">{TITLE}</span>
        <span className="td-ctrl">
          <button className="td-btn td-btn--primary" onClick={playPause}>
            {running ? <PauseIcon /> : <PlayIcon />}
            {done ? L.replay : running ? L.pause : L.play}
          </button>
          <button className="td-btn" onClick={step} disabled={done}><StepIcon />{L.step}</button>
          <button className="td-btn" onClick={reset}><ResetIcon />{L.reset}</button>
          <span className="td-count">{shown}/{cmds.length}</span>
        </span>
      </div>
      <div className="td-screen">
        {Array.from({
    length: idx + 1
  }).map((_, i) => {
    const c = cmds[i];
    if (!c) return null;
    const isCur = i === idx;
    const cmdText = isCur ? c.cmd.slice(0, typed) : c.cmd;
    const lines = isCur ? c.lines.slice(0, outN) : c.lines;
    const cursor = isCur && !done && stage === "cmd";
    return <div className="td-block" key={i}>
              <div className="td-cmdline">
                <span className="td-prompt">{PROMPT}</span> <span className="td-cmd">{cmdText}</span>
                {cursor && <span className="td-cursor" />}
              </div>
              {lines.map((ln, j) => {
      const tr = ln.trim();
      const cls = tr.startsWith("✓") ? "ok" : tr.startsWith("✗") || tr.startsWith("✘") ? "err" : "";
      return <div className={"td-out " + cls} key={j}>{ln.length ? ln : " "}</div>;
    })}
            </div>;
  })}
      </div>
      <div className="td-hint">{L.hint}</div>
    </div>;
};

`NVIDIA` `CUDA`

CUDA (Compute Unified Device Architecture) is the soul of NVIDIA GPUs: it transforms a graphics card from a gaming device into a massively parallel supercomputer.
Combined with cuDNN (CUDA Deep Neural Network Library), we can leverage GPU-accelerated model training in PyTorch or TensorFlow.

This guide walks through correctly installing and configuring these core components on Windows. Once you understand the configuration, the same process applies to a Linux environment with minor adjustments.

<Tip>
  **Why does this matter?**

  Environment configuration is the first hurdle in AI development. Version mismatches are one of the most time-consuming problems developers and researchers encounter.
  Getting the installation right once saves countless hours of debugging `RuntimeError` down the road.
</Tip>

## 1. Updating the GPU Driver

Before installing CUDA, having a healthy driver version is a prerequisite.

<Steps>
  <Step title="Check system information">
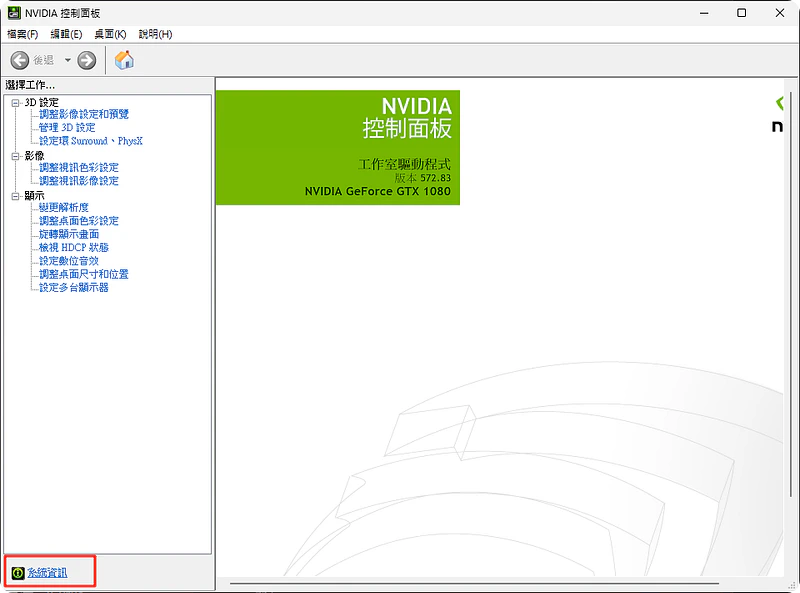
    Right-click on an empty area of the desktop, open the **NVIDIA Control Panel**, and click "System Information" in the lower-left corner.

    <img src="https://mintcdn.com/felimet/o4nUK2uwNPSF27VA/images/cuda-setup/fig1.png?fit=max&auto=format&n=o4nUK2uwNPSF27VA&q=85&s=6c22a8a7f481b7713793143c696d1817" alt="NVIDIA Control Panel System Information" width="800" height="593" data-path="images/cuda-setup/fig1.png" />
  </Step>

  <Step title="Confirm the current version">
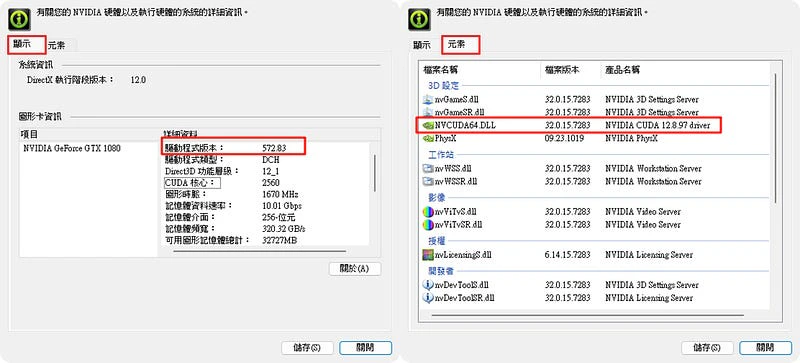
    In System Information, you can see the current driver version and the maximum supported CUDA version.

    <img src="https://mintcdn.com/felimet/o4nUK2uwNPSF27VA/images/cuda-setup/fig2.jpg?fit=max&auto=format&n=o4nUK2uwNPSF27VA&q=85&s=ba0cb39e86769b22f62585a9d4961fa7" alt="Driver version information" width="800" height="363" data-path="images/cuda-setup/fig2.jpg" />
  </Step>

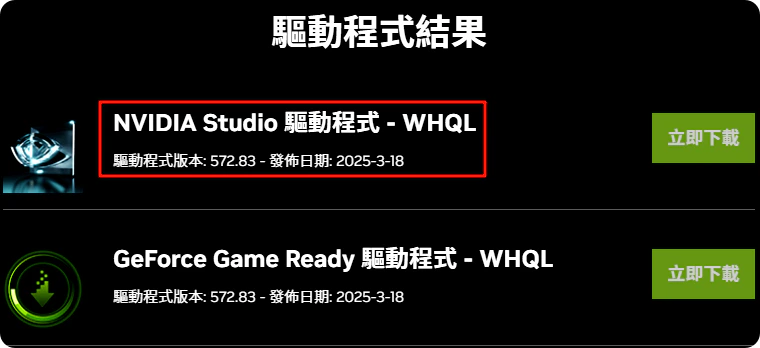
  <Step title="Download the latest driver">
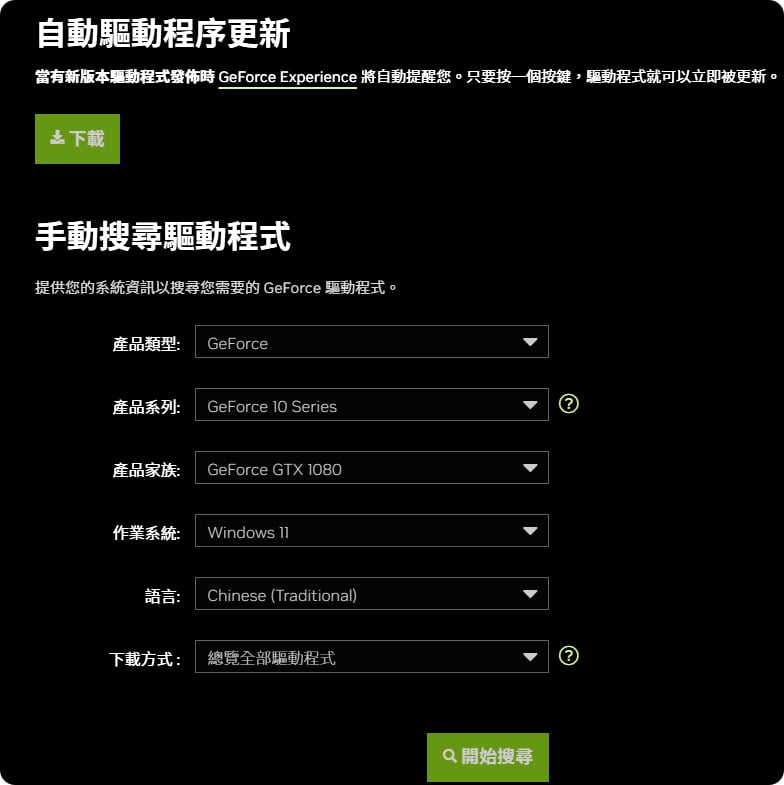
    Go to the [NVIDIA Driver Downloads page](https://www.nvidia.com/zh-tw/geforce/drivers/).

    <img src="https://mintcdn.com/felimet/o4nUK2uwNPSF27VA/images/cuda-setup/fig3.png?fit=max&auto=format&n=o4nUK2uwNPSF27VA&q=85&s=35aadb22c9a9f3a8244f9d9a80e8047f" alt="Update driver" width="784" height="785" data-path="images/cuda-setup/fig3.png" />

    <Note>
      **Studio Driver or Game Ready?**

      * **Game Ready Driver**: Optimized for the latest games, updated frequently.
      * **Studio Driver**: Optimized for creative software (Blender, Premiere) and stability.

      **Recommendation**: For deep learning development, either works. If you don't play cutting-edge AAA titles regularly, the **Studio Driver** is generally more stable.
    </Note>
  </Step>

  <Step title="Install and restart">
    Run the installer after downloading. Screen flickering and brief blackouts during installation are normal. After installation, **be sure to restart your computer** to apply the changes.

    <img src="https://mintcdn.com/felimet/o4nUK2uwNPSF27VA/images/cuda-setup/fig4.png?fit=max&auto=format&n=o4nUK2uwNPSF27VA&q=85&s=48ae790b1cf032d65be4d46e48c1473c" alt="Driver installation screen" width="760" height="348" data-path="images/cuda-setup/fig4.png" />
  </Step>

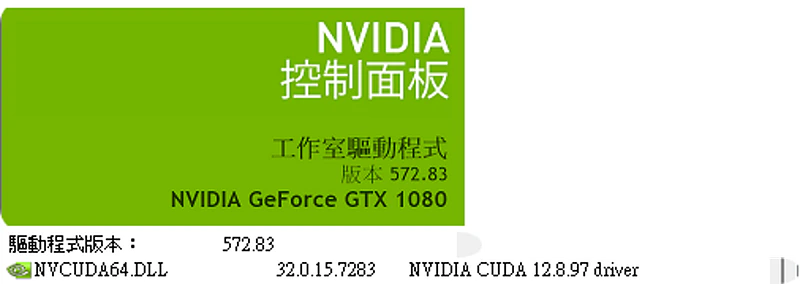
  <Step title="Verify the driver">
    After restarting, verify that the driver version is correct.

    <img src="https://mintcdn.com/felimet/o4nUK2uwNPSF27VA/images/cuda-setup/fig5.png?fit=max&auto=format&n=o4nUK2uwNPSF27VA&q=85&s=05d72500340200a063c5c2101864f1eb" alt="Driver verification screen" width="800" height="284" data-path="images/cuda-setup/fig5.png" />
  </Step>
</Steps>

## 2. Installing the CUDA Toolkit

The CUDA Toolkit includes compilers, development tools, and runtime libraries.

For the official installation procedure, refer to the [CUDA Installation Guide for Microsoft Windows](https://docs.nvidia.com/cuda/cuda-installation-guide-microsoft-windows/index.html).

<Note>
  **Overview**

  * CUDA (Compute Unified Device Architecture) is a parallel computing platform and programming model developed by NVIDIA. It harnesses the computational power of NVIDIA GPUs to accelerate scientific computing, image processing, machine learning, and more. It achieves high-performance parallel processing by distributing computational tasks across thousands of GPU cores.
  * cuDNN (CUDA Deep Neural Network Library) is a high-performance library optimized by NVIDIA for deep learning, built on top of CUDA.
</Note>

<Steps>
  <Step title="Confirm version requirements">
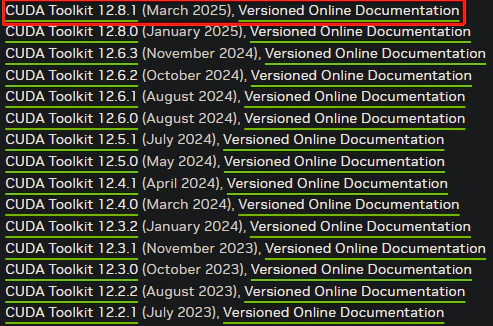
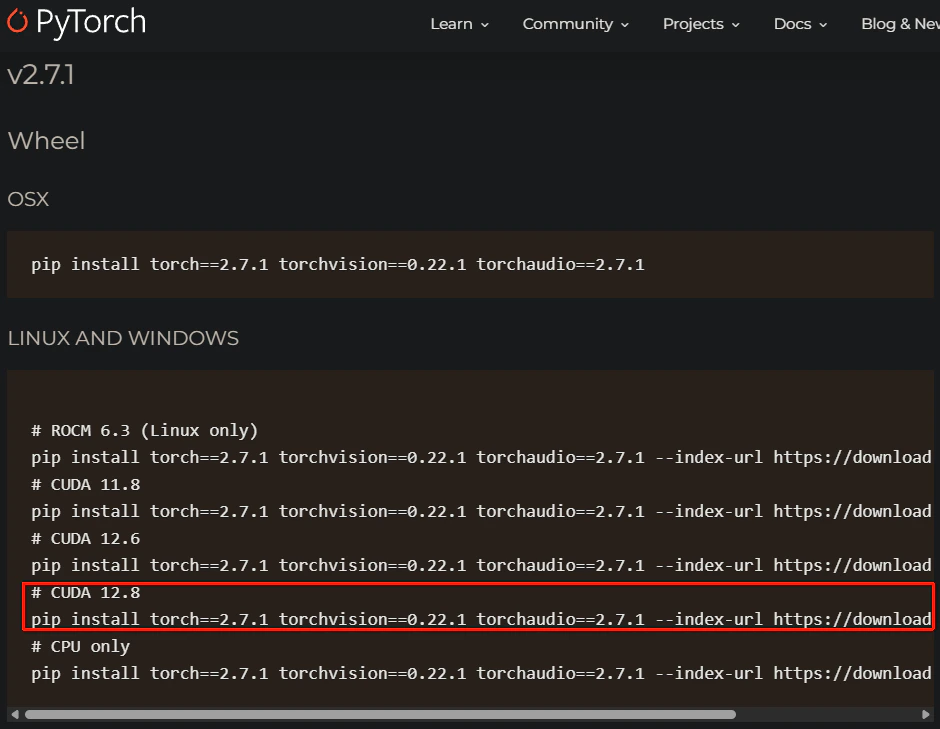
    Newer is not always better! First check which versions your deep learning framework (PyTorch/TensorFlow) supports.

    * [PyTorch version compatibility table](https://pytorch.org/get-started/previous-versions/)
    * [CUDA Toolkit Archive](https://developer.nvidia.com/cuda-toolkit-archive)

    <Tabs>
      <Tab title="CUDA Toolkit selection example">
        <p>This example uses CUDA 12.8.1 as a demonstration.</p>
        <p>Note that you must confirm which versions PyTorch supports.</p>

        <img src="https://mintcdn.com/felimet/o4nUK2uwNPSF27VA/images/cuda-setup/fig18.png?fit=max&auto=format&n=o4nUK2uwNPSF27VA&q=85&s=a1b6f326a58793037b35ed0db1cdd4b7" alt="CUDA Toolkit download options list" width="493" height="326" data-path="images/cuda-setup/fig18.png" />
      </Tab>

      <Tab title="PyTorch selection example">
        <p>Choose a PyTorch version that matches your CUDA Toolkit version.</p>

        <img src="https://mintcdn.com/felimet/o4nUK2uwNPSF27VA/images/cuda-setup/fig16-1.png?fit=max&auto=format&n=o4nUK2uwNPSF27VA&q=85&s=409bac256f8b653d98e3f25d5a62dad0" alt="PyTorch download options list" width="940" height="729" data-path="images/cuda-setup/fig16-1.png" />
      </Tab>
    </Tabs>
  </Step>

  <Step title="Choose the installer type">
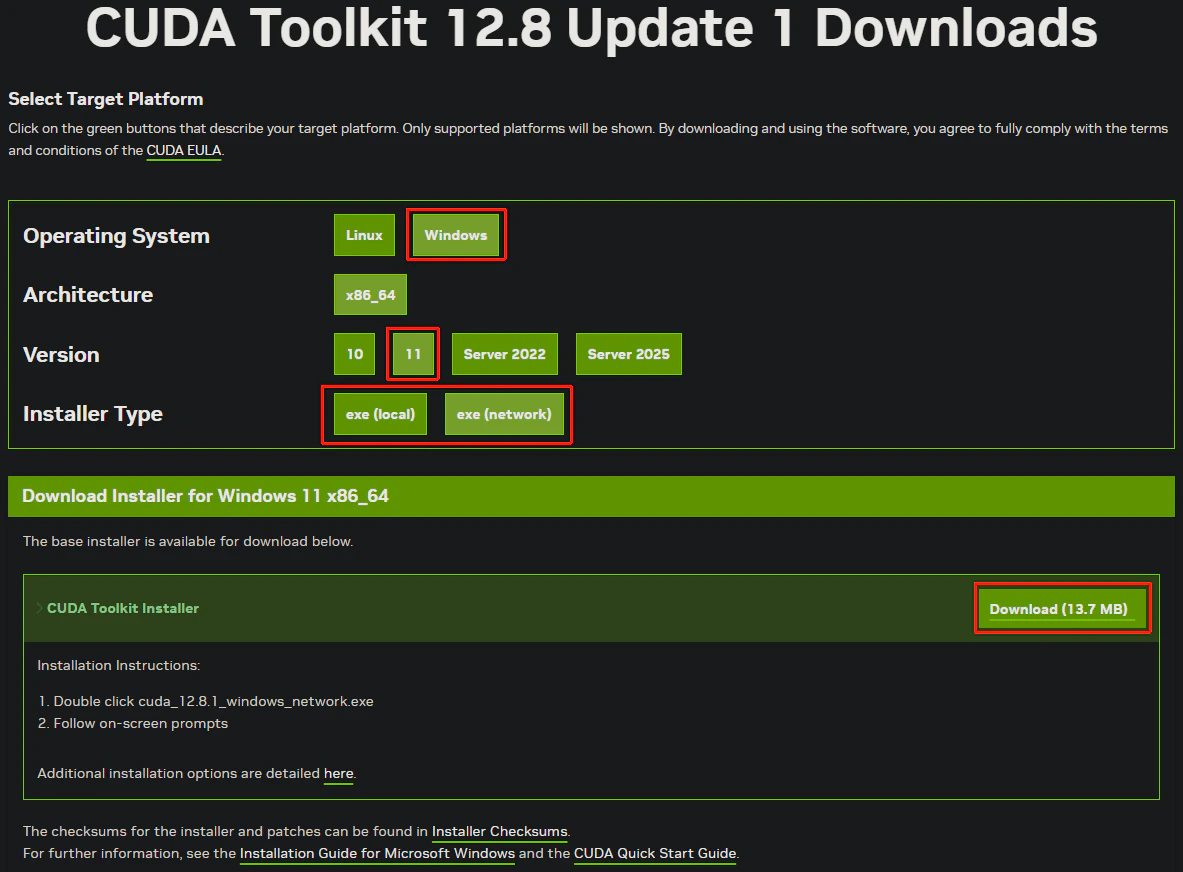
    On the download page, you will see two installer types:

    | Type                    | Network (exe)                                                | Local (exe)                                        |
    | :---------------------- | :----------------------------------------------------------- | :------------------------------------------------- |
    | **File size**           | Small (\~13.7 MB)                                            | Large (\~3.3 GB)                                   |
    | **Installation method** | Downloads components during installation (requires internet) | Offline installation (includes all components)     |
    | **Recommendation**      | Fine if your connection is fast                              | **Recommended** (avoids interrupted installations) |

    <img src="https://mintcdn.com/felimet/o4nUK2uwNPSF27VA/images/cuda-setup/fig6.png?fit=max&auto=format&n=o4nUK2uwNPSF27VA&q=85&s=3541edbac8508856dffee883e46ffcf3" alt="CUDA Toolkit download options" width="1183" height="872" data-path="images/cuda-setup/fig6.png" />
  </Step>

  <Step title="Run the installer">
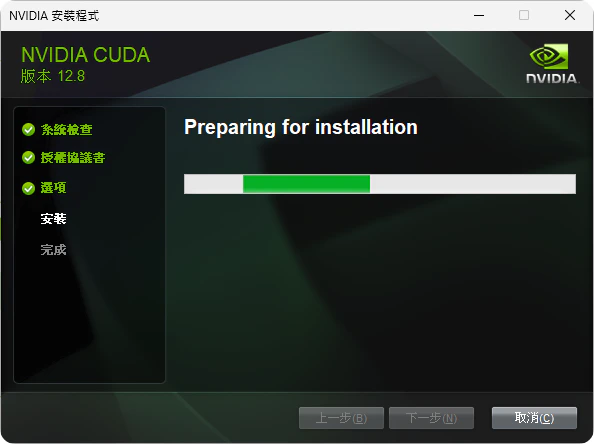
    Execute the downloaded `.exe` file. For most users, selecting **"Express"** installation is sufficient.

    If you are an advanced user who needs multiple CUDA versions to coexist, choose "Custom" and deselect the Driver component (since you already installed the latest driver in step 1).

    <img src="https://mintcdn.com/felimet/o4nUK2uwNPSF27VA/images/cuda-setup/fig7.png?fit=max&auto=format&n=o4nUK2uwNPSF27VA&q=85&s=4e0663e691286d509df7ade9b514d30f" alt="CUDA installation options" width="594" height="444" data-path="images/cuda-setup/fig7.png" />
  </Step>

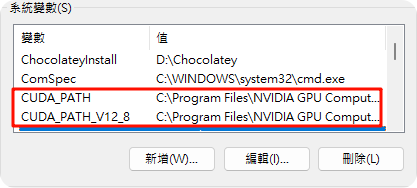
  <Step title="Verify environment variables">
    The installer normally adds environment variables automatically. Check whether `CUDA_PATH` is present:

    1. Search for **"Edit the system environment variables"**
    2. Click **"Environment Variables"**
    3. Look for `CUDA_PATH` under system variables

           <img src="https://mintcdn.com/felimet/o4nUK2uwNPSF27VA/images/cuda-setup/fig9.png?fit=max&auto=format&n=o4nUK2uwNPSF27VA&q=85&s=27f9a877cc8054feeeea5bd53252ce4d" alt="Environment variable check" width="417" height="188" data-path="images/cuda-setup/fig9.png" />

    If it is missing, check whether the folder exists and add the following paths manually:

    | Variable name      | Path                                                     |
    | :----------------- | :------------------------------------------------------- |
    | CUDA\_PATH         | C:\Program Files\NVIDIA GPU Computing Toolkit\CUDA\v12.8 |
    | CUDA\_PATH\_V12\_8 | C:\Program Files\NVIDIA GPU Computing Toolkit\CUDA\v12.8 |

    Open a terminal (PowerShell / CMD) and run the verification command:

    ```powershell theme={null}
    nvcc -V
    ```

    If you see output similar to `Cuda compilation tools, release 12.x, V12.x.x`, the installation was successful.

    <img src="https://mintcdn.com/felimet/o4nUK2uwNPSF27VA/images/cuda-setup/fig10.png?fit=max&auto=format&n=o4nUK2uwNPSF27VA&q=85&s=1b3e7d3a39574d9a4778bdb8b9b9b76c" alt="Verification output" width="508" height="100" data-path="images/cuda-setup/fig10.png" />
  </Step>
</Steps>

## 3. Configuring cuDNN

cuDNN is the critical library that accelerates neural network computation. It is not an executable; it is a set of binary files that must be placed manually.

<Steps>
  <Step title="Download cuDNN">
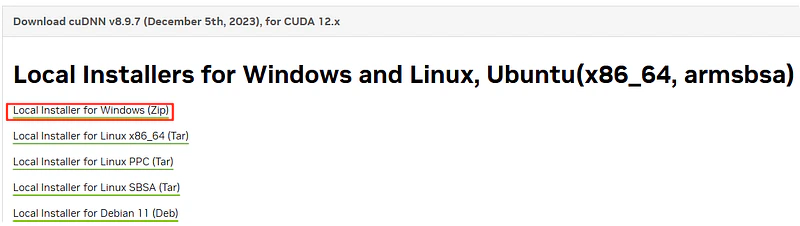
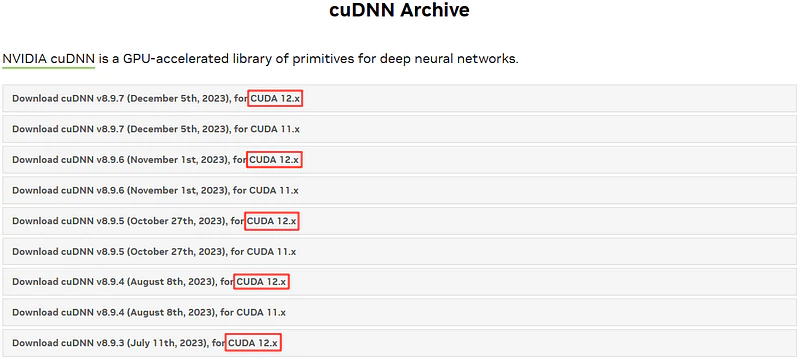
    Go to the [cuDNN Archive](https://developer.nvidia.com/rdp/cudnn-archive) (requires an NVIDIA Developer account login).
    Download the **Zip archive** that corresponds to your CUDA version (12.x for CUDA 12.x).

    The cuDNN version number (e.g., cuDNN v8.x.x) refers to NVIDIA's versioning of the library itself.

    <img src="https://mintcdn.com/felimet/o4nUK2uwNPSF27VA/images/cuda-setup/fig11.png?fit=max&auto=format&n=o4nUK2uwNPSF27VA&q=85&s=15c642f4dfd76439311af0034e62da7d" alt="cuDNN Archive page" width="800" height="359" data-path="images/cuda-setup/fig11.png" />

    <img src="https://mintcdn.com/felimet/o4nUK2uwNPSF27VA/images/cuda-setup/fig12.png?fit=max&auto=format&n=o4nUK2uwNPSF27VA&q=85&s=bc23b5273f5c7ec9d053973a09854d22" alt="cuDNN download page" width="800" height="226" data-path="images/cuda-setup/fig12.png" />
  </Step>

  <Step title="Extract and copy files">
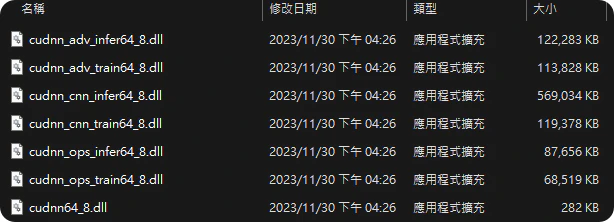
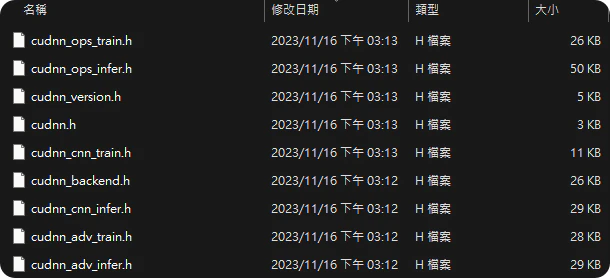
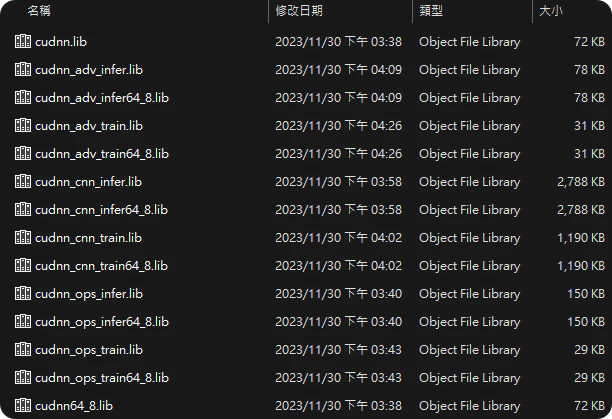
    Extract the downloaded zip file. You will see folders named `bin`, `include`, and `lib`. You need to copy these files into the CUDA installation directory.

    Default CUDA path: `C:\Program Files\NVIDIA GPU Computing Toolkit\CUDA\v12.x`

    Perform the following copy operations in order (the system may prompt for administrator privileges):

    <Tree>
      <Tree.Folder name="Extracted folder" defaultOpen>
        <Tree.Folder name="bin" defaultOpen>
          <Tree.File name="cudnn*.dll" />
        </Tree.Folder>

        <Tree.Folder name="include" defaultOpen>
          <Tree.File name="cudnn*.h" />
        </Tree.Folder>

        <Tree.Folder name="lib" defaultOpen>
          <Tree.Folder name="x64" defaultOpen>
            <Tree.File name="cudnn*.lib" />
          </Tree.Folder>
        </Tree.Folder>
      </Tree.Folder>
    </Tree>

    Copy each file to the CUDA install directory (`...` = `C:\Program Files\NVIDIA GPU Computing Toolkit\CUDA\v12.x`):

    * `bin\cudnn*.dll` ➡️ `...\bin`
    * `include\cudnn*.h` ➡️ `...\include`
    * `lib\x64\cudnn*.lib` ➡️ `...\lib\x64`

    <img src="https://mintcdn.com/felimet/o4nUK2uwNPSF27VA/images/cuda-setup/fig13.png?fit=max&auto=format&n=o4nUK2uwNPSF27VA&q=85&s=45d31dedd68bfd17727ab9b80ee75b63" alt="Copy cudnn dll to the CUDA bin directory" width="614" height="222" data-path="images/cuda-setup/fig13.png" />

    <img src="https://mintcdn.com/felimet/o4nUK2uwNPSF27VA/images/cuda-setup/fig14.png?fit=max&auto=format&n=o4nUK2uwNPSF27VA&q=85&s=c7fc30df17f403ec53413f74460d503c" alt="Copy cudnn header to the CUDA include directory" width="610" height="278" data-path="images/cuda-setup/fig14.png" />

    <img src="https://mintcdn.com/felimet/o4nUK2uwNPSF27VA/images/cuda-setup/fig15.png?fit=max&auto=format&n=o4nUK2uwNPSF27VA&q=85&s=86793fa0cae703a37ccac6d276399274" alt="Copy cudnn lib to the CUDA lib x64 directory" width="612" height="419" data-path="images/cuda-setup/fig15.png" />

    <Warning>
      **Where exactly should files go?**

      Make sure you are **merging** files into the existing folders; do **not** replace or delete the original folders themselves!
    </Warning>
  </Step>

  <Step title="Check cuDNN environment variables">
    Ensure that `C:\Program Files\NVIDIA GPU Computing Toolkit\CUDA\v12.x\bin` has been added to the system **Path** environment variable.

    `C:\Program Files\NVIDIA GPU Computing Toolkit\CUDA\v12.x\lib\x64` does **not** need to be added to the system Path (it is handled by the compiler configuration).

    | Path                     | Purpose                           | Add to PATH?                               |
    | :----------------------- | :-------------------------------- | :----------------------------------------- |
    | `...\CUDA\v12.x\bin`     | Load `.dll` files at runtime      | **Yes**                                    |
    | `...\CUDA\v12.x\lib\x64` | Link `.lib` files at compile time | **No** (handled by compiler configuration) |

    * Ensure the runtime can locate `.dll` files (add `bin` to PATH).
    * Ensure the compiler can locate `.lib` files (handled by compiler configuration).
    * If you need to specify the `lib\x64` path explicitly, configure it in your compiler settings (e.g., the library path in Visual Studio).

    <Tip>
      **Deployment note**

      This procedure covers rapid deployment of CUDA and cuDNN. For more advanced configurations, such as running multiple CUDA versions side by side or using Conda environments, you can adjust the paths and management approach accordingly. For the most up-to-date information, refer to the [NVIDIA official documentation](https://docs.nvidia.com/deeplearning/cudnn/installation/overview.html).
    </Tip>
  </Step>
</Steps>

## 4. Verification and Testing

The environment is set up, but does it actually work? First, see what the full verification flow looks like end to end: from `nvidia-smi` to confirm the driver, `nvcc -V` to confirm the compiler, to a PyTorch cuDNN test. The output you should see at each step on success is all here.

<TerminalDemo lang="en" />

Run `nvidia-smi` in a terminal to see the maximum CUDA version supported by your driver (e.g., `CUDA Version: 12.4`).

### Create a test environment

Using [Conda](/en/notes/software/languages/python/conda-guide/) to isolate the environment is recommended, to avoid conflicts with the system Python.

```bash theme={null}
# Create a Python 3.11 environment
conda create -n test_gpu python=3.11 -y

# Activate the environment
conda activate test_gpu

# Install PyTorch (adjust the version according to the official instructions)
pip install torch torchvision --index-url https://download.pytorch.org/whl/cu128
```

<Tip>
  **CUDA version compatibility**

  CUDA supports [backward compatibility](https://docs.nvidia.com/deploy/cuda-compatibility/index.html). See the FAQ: [Does a newer driver break older CUDA versions?](#q-does-a-newer-driver-break-older-cuda-versions).
</Tip>

### Run a test script

Create a `gpu_test.py` file and execute it:

```python title="gpu_test.py" theme={null}
import torch
import torch.nn as nn

print("="*40)
print(f"PyTorch Version: {torch.__version__}")
print(f"CUDA Available:  {torch.cuda.is_available()}")

if torch.cuda.is_available():
    device = torch.device("cuda")
    print(f"Device Name:     {torch.cuda.get_device_name(device)}")
    print(f"CUDA Version:    {torch.version.cuda}")
    
    # Simple convolution test for cuDNN
    try:
        model = nn.Conv2d(1, 1, 3).to(device)
        data = torch.randn(1, 1, 64, 64).to(device)
        out = model(data)
        print("✓ cuDNN Test Passed! Convolution executed successfully.")
    except Exception as e:
        print(f"✗ cuDNN Error: {e}")
else:
    print("✗ CUDA not detected.")
print("="*40)
```

If the output contains `✓ cuDNN Test Passed!`, congratulations, your GPU computing environment is ready.

## Troubleshooting

### Q: `nvcc -V` command not found?

**A:** Confirm that `C:\Program Files\NVIDIA GPU Computing Toolkit\CUDA\v12.x\bin` has been added to the **Path** system environment variable.

### Q: PyTorch raises `AssertionError: Torch not compiled with CUDA enabled`

**A:** You likely installed the CPU-only version of PyTorch. Run `pip uninstall torch` to remove it, then reinstall using `--index-url` to point to the CUDA-enabled wheel source.

### Q: Does a newer driver break older CUDA versions?

**A:** Generally, no. NVIDIA drivers have **backward compatibility**. A newer driver (e.g., 550.xx) can run programs compiled with an older CUDA Toolkit (e.g., 11.8). The reverse, running a newer CUDA toolkit with an older driver, is not supported. For detailed compatibility rules (Minor Version Compatibility, Forward Compatibility, etc.), refer to the [CUDA Version Compatibility](https://docs.nvidia.com/deploy/cuda-compatibility/index.html) documentation.

***